I’ve shown up at a trailhead with a fresh salon manicure and felt the sinking moment when my look didn’t match the mood of the trip. I get that tug between wanting a wow-worthy finish and not knowing where to start.
I’m writing from that exact place. I’ll share how I turned a simple polish base and decals into outdoorsy nail art that feels pro but uses everyday tools.
Quick peek: I relied on the Whats Up Nails B070 Campfire Stories stamping plate, holo flake polishes layered with Picture Polish shades and ILNP Better Days, and a sticky base coat to transfer crisp images. Two coats of base, alternating tire-track stamps, acetone clean-up, and a glossy top coat made the look last through hikes and campfire stories.
I won’t overload you. Expect playful ideas—tire-track accents, faint campfire glow, and clever decal tricks—that you can explore at your own pace. I’ll show variations and unexpected twists so you can pick a direction and play.
Key Takeaways
- I relate: I’ve been the person whose manicure didn’t match the trip vibe.
- One stamping plate and a sticky base can unlock many looks.
- Holo flakes and layered polishes add texture without roughness.
- Simple steps—two base coats, stamp, clean, seal—keep a manicure lasting.
- The goal is playful experimentation, not perfection on the first try.
When your nails don’t match your weekend at the campground
I unzipped the tent and instantly noticed my bright polish looked wrong for the trip. That small moment summed up the gap between what I love and what works outdoors.
The moment I realized my manicure didn’t fit my tent-and-trails vibe
I remember standing by the stove thinking my glossy pink manicure looked too delicate for a dusty trail. Cute, yes—but not practical for a long summer weekend.
That’s when I started asking how to keep my favorite art while making a look that lasts through hikes and hammock time.
Why cute meets practical matters for outdoor nail art
Small swaps made a big difference. I traded fragile florals for bold stamps and added decals that read outdoors at a glance. Alternating tire-track stamps on outer nails added movement without a full overhaul.
My workflow changed, too: build decals while base coats dry, use a sticky base coat to transfer images, clean edges with acetone, then seal with a smudge-free glossy top. These tweaks saved me time and kept the result looking intentional by headlamp light.
- Quick wins: decals + stamps = fast personality.
- Practical win: fewer chips, faster clean-up.
The tension: I want wow-worthy camping nail art, but where do I start?
The more images I saved, the less sure I was how to start.
I felt overwhelmed by options but wanted a standout look that lasts through water, dirt, and long summer days. So I simplified the steps and my stash.
Too many images, not enough simple steps
First, I stopped scrolling and picked one plate with bold, thick stamps. That decision cut my prep time and kept my focus on execution.
What helped: build decals while two base coats dry, use thicker stamps so images read after a day out, and apply a sticky base layer for easy placement.
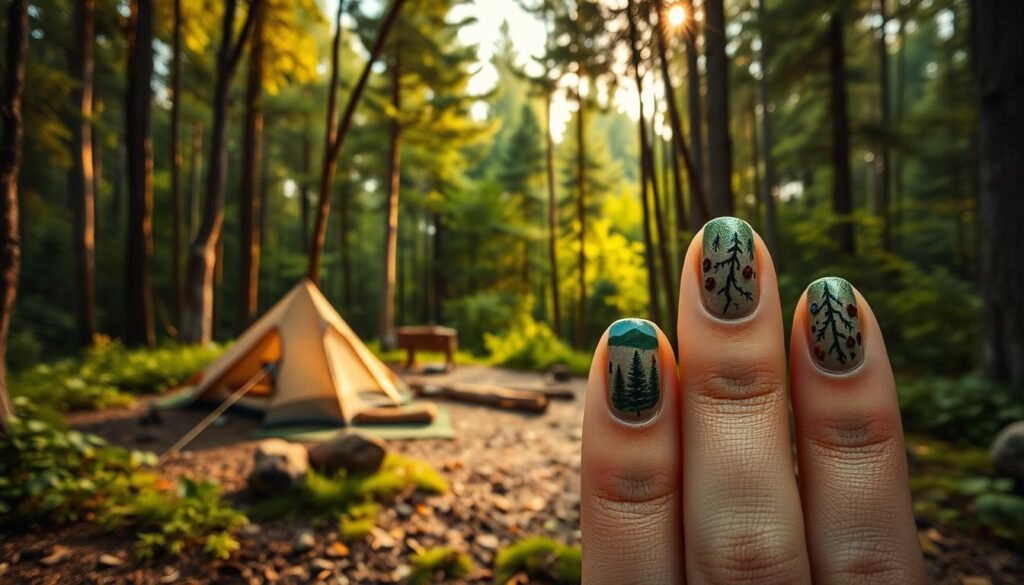
Making designs last through water, dirt, and long summer days
Longevity is a sequence: base, stamp or decal, light acetone clean-up, then seal. This routine saved my polish from chips on multi-day trips.
- I used bold plate images that are easy to fill.
- Thicker decals hold up better when hands get wet.
- A quick tacky base under decals prevents lifting so I spend less time fixing edges.
| Step | Why it works | Key result |
|---|---|---|
| Pick one bold plate | Limits choices and speeds action | Faster progress |
| Build decals while base dries | Saves time and reduces smudges | Cleaner finish |
| Sticky base + thick stamps | Better adhesion and visual hold | Lasts through water and long days |
Short promise: once you try bold images and this order, you’ll feel confident to test more decals and color mixes without overthinking.
My inspiration and toolkit from the trail
One small kit cut my prep time and kept polish readable after a long day outdoors. I leaned into a few trusted products that let me build looks fast and fix them on the go.
Stamping plate that started it all
Whats Up Nails B070 Campfire Stories has thick, crisp lines that read well after a hike. A single image sets the mood quickly—tents, pines, and campfire shapes without tiny fiddly parts.
Brushes, decals, and the sticky base
I keep a NailStuff.ca 4mm nail art brush that doubles as my art brush for quick fills. The sticky base coat sits in arm’s reach; it’s the reason decals lay flat and stay put on first placement.
Holo flake polishes for texture without roughness
I use Picture Polish shades and ILNP Better Days for form and shine. The holo flake polish adds depth but stays smooth under top coat.
- Stamper & scraper: precise placement on curved nails.
- Neither Noir stamping polish: high contrast for crisp image transfer.
- Two-top-coat routine: smudge-free lock, then glossy volume.
| Tool | Why I bring it | Win |
|---|---|---|
| B070 Plate | Bold, easy-to-fill images | Fast theme setting |
| 4mm NailStuff.ca brush | Small, precise filling | Clean color blocks |
| Sticky base + top coats | Secure decals and protect art | Longer wear, glossy finish |
Set the scene: build a color story that feels like camp
My color choices start with the view from the tent flap and slow down from there. I aim for an earth-to-sky palette that reads fast and holds up during a day outside.
Earth to sky: browns on outer nails, light and deep blues at the center
I place warm browns on thumb, pointer, and pinky—I use Picture Polish Owl for a grounded base. The middle gets a lighter lake blue (Lakodom or London), and the ring wears a deeper Winter blue. This order keeps stamped art legible and bold at a glance.
Summer-friendly hues that pop under a glossy top coat
High contrast matters. Lighter center shades with darker edges make the motif read in daylight and photos. I cap everything with a glossy top coat so the holo flake polish adds sparkle without texture when I zip a jacket or sling a pack.
Curious twist: add a hint of gold to spark “campfire glow”
I like a thin thread of gold near a fire focal nail. A tiny warm streak suggests ember glow without going fully metallic. Try a subtle gradient on one nail from dusk blue to sky and keep your palette to three polishes max—intentional, photo-friendly, and easy to mix into your next camping-inspired art or decal placement.
Step-by-step camping nails designs you can actually do
A single ruined thumbnail taught me which steps actually matter on the trail. Below I break the routine into clear moves so you spend less time fixing and more time enjoying the view.
Prep and base
Start with clean nail beds and apply two thin coats of base polish. I use Picture Polish Owl for browns and Lakodom for light blue depending on the palette.
Let the coats dry while you build decals on a silicone mat.
Stamp and fill
Pick thick-lined images from the B070 Campfire Stories plate. Stamp with Neither Noir, then color small sections using a 4mm nail art brush (my go-to art brush).
Transfer like a pro
Add a thin sticky base to the target nail and wait until it’s tacky. Press the decal from center outward so the form hugs the curve without creasing.
Clean and seal
Remove excess with an acetone-dipped clean-up brush or metal cuticle tool for crisp borders.
Lock details with Apipila Smudge Free Top Coat, then finish with Gloss Over for shine and durable volume.
- Quick tip: alternate tire-track stamps on outer nails for implied motion without extra steps.
- Keep products close—stamper, scraper, sticky base, acetone—so the flow stays smooth.
Choose your trail: curiosity-driven variations to try next
I often start with a single accent nail and build a tiny story around it. Pick one motif and treat the rest as supporting texture. That keeps the process playful and prevents overthinking.
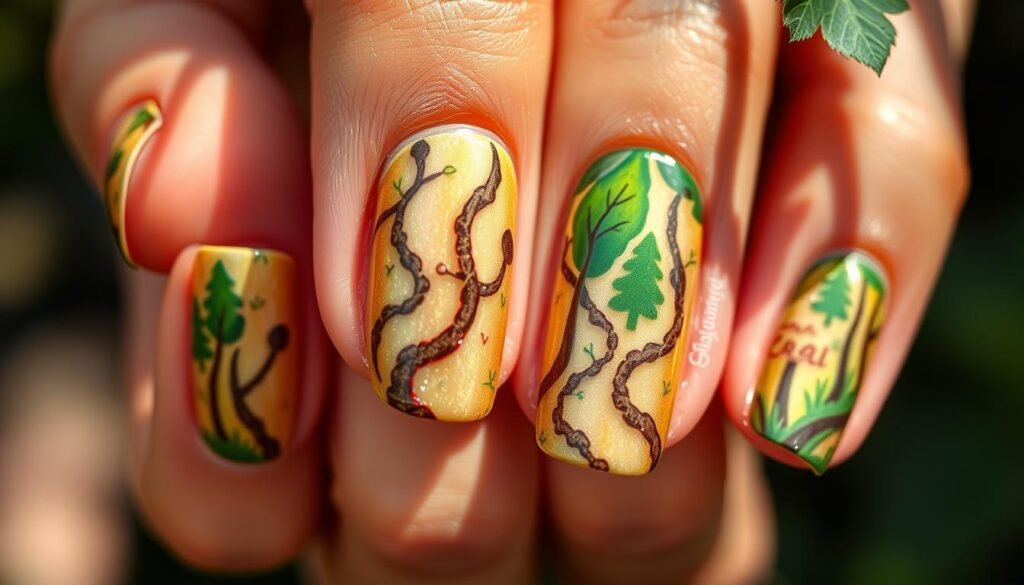
Hiking marks
What I’d try: alternate tire-track stamps on outer nails so they read like path ruts. Flip the direction on each side for instant movement and a rugged feel.
Campfire silhouettes
Build bold decals of tents and pines from the Campfire Stories plate. Dot tiny stars over a dark center nail so the night sky reads even by headlamp—use small, clear decals for crisp contrast.
Water adventures
Layer a soft gradient on the ring nail from deep blue to lake blue, then add a small paddle or wave decal for a subtle nod to water play. Keep decals bold so the motif holds up in wet conditions.
City-meets-camp
Stamp a minimalist skyline on one middle nail and a forest silhouette on the other. The contrast makes each motif pop and feels like two stories told at once.
Quick-switch ideas
Swap in mossy green on outer nails, wash the center with a dusk gradient, or add a whisper of gold on an index as ember “sparks.” Keep one focal decal and repeat it once for cohesion on a summer weekend.
| Variation | Mood | Quick tip |
|---|---|---|
| Hiking marks | Active, textured | Alternate tire-track stamps; cap edges with a thin top pass |
| Campfire silhouettes | Cozy, night sky | Use bold decals and tiny star dots; seal without flooding lines |
| Water adventures | Calm, reflective | Soft gradient + paddle decal; keep decals small and bold |
| City-meets-camp | Modern contrast | One skyline, one forest nail; use same polish set for unity |
My promise: I’ll try the skyline + forest next—one repeated decal, one accent gradient, and a light top pass to keep lines crisp. These prompts keep the work fun, not perfect, and let your next set tell a short trip story.
Make it last: durability tips for days outside
After several trips, I found a few habits that stretch a manicure through long days outdoors. These are simple moves I use every time I pack light and expect wear.
Layering for longevity
Smudge-free first, volume-building after
I seal art with Apipila Smudge Free Top Coat first. That locks lines and stops smudges so decals sit smooth.
Then I follow with a generous layer of Whats Up Nails Gloss Over Top Coat for shine and durable volume. Thin, even coats dry faster and hold better than one thick pass.
“Lock details first, then build shine—this two-step saves my manicure after a long day.”
Edge capping and mid-trip refresh
I always cap the free edge on every nail to slow tip wear; this tiny move buys real time before chips show.
If I’m out for multiple days, a thin top coat on night two revives gloss and seals micro-wear without disturbing the art.
- Clean edges with an acetone brush to remove excess at the cuticle; crisp borders make a set look fresh.
- A light base repair under lifting corners can re-anchor a decal when needed.
- Avoid long soaks in water right after a refresh coat; pat dry instead of rubbing.
- I pack only essential products: smudge-free sealer, glossy finisher, and a tiny clean-up brush so I save time and space.
| Action | Why it helps | When to do it |
|---|---|---|
| Smudge-free layer | Locks detail and prevents running | Immediately after decals and clean-up |
| Gloss over top coat | Adds shine and durable volume | After smudge-free coat dries |
| Edge cap | Slows tip wear | Every application |
| Thin mid-trip refresh | Restores gloss without lifting | Night two on long trips |
Ready to pitch your mani? Try it today and share your look
Quick win, pick an earth-and-sky color pair and one bold decal from the Campfire Stories plate. I find a single focal nail and a simple tire-track accent make my nails feel camp-ready in minutes.
Use a sticky base to place the decal, lock lines with a smudge-free sealer, then finish with Gloss Over top for shine. Try a whisper-thin gold ember highlight on one finger if you want a hint of warmth.
Start small: one silhouette, one repeat motif, one polish swap. Share a photo of your nail art under open sky—I love seeing how a tiny change can fix that mismatch between look and trip.
Go try one idea now and iterate—practical, rugged, and still a little magical.
FAQ
How do I prep my nails for long-lasting camp-themed nail art?
I start with clean, dry nails, then apply a thin base coat to protect my natural nail and help polish adhere. I use two thin color coats, letting each dry fully. For transfer decals or stamped images I add a slightly tacky base or sticky base coat so images sit flat. Finish with a glossy top coat and edge-capping to lock everything in place for outdoor wear.
What tools and products should I pack for a mani touch-up on a weekend trip?
I bring a small kit: a fast-dry top coat, a clear base coat, a compact nail file, a 4mm nail art brush, acetone wipes for quick clean-up, and a tiny jar of polish remover. I also pack a couple of mini polishes in neutral and blue tones, a sheet of decals, and a slim bottle of cuticle oil to keep my manicure fresh after hiking or water activities.
How can I make stamped or decal images transfer cleanly outdoors?
I work on a smooth, fully dried base and use a sticky base coat when transferring. Press the stamping plate or decal gently and roll it onto the nail to avoid air bubbles. If the image lifts, I re-press immediately. After placement I seal with a thin layer of top coat, then a second thicker coat for durability.
Which color story works best for a camp-inspired look that’s still summer-friendly?
I like an earth-to-sky palette: warm browns on the outer nails and light to deep blues in the center. Add a hint of gold or holo flake polish for a campfire glow without texture. These tones read well in sunlight and pair nicely with glossy top coats for extra pop.
Can I create gradient water or sky effects without special tools?
Yes. I use a small makeup sponge and dab polishes in overlapping strokes to build a smooth gradient. Work in thin layers and let each layer dry a bit before the next. Seal with a quick-dry top coat to smooth any sponge texture and keep the gradient bright through water and activity.
How do I keep intricate art from chipping during hikes, swims, or long summer days?
I focus on layering: a strong base, fully cured color coats, and two top coats—one thin for smudge resistance, then a thicker, volume-building top coat for impact. I also edge-cap the free edge and reapply a thin top coat mid-trip if I notice wear. Avoid rough files or scraping against rocks to prolong life.
What’s the easiest way to add campfire or tent silhouettes on short nails?
I scale down the motifs and place them on one or two feature nails instead of every nail. Use small decals or a fine art brush to paint tiny triangles and pines. A hint of gold or holo flake polish behind the silhouette gives depth and looks like ember glow without overwhelming short nail beds.
Are water-resistant polishes or top coats worth it for outdoor looks?
Absolutely. I choose fast-dry, durable polishes and a resilient top coat labeled for outdoor or long-wear use. Those formulas resist smudging from water and sweat. A glossy sealer also helps repel dirt and makes cleanup easier after a muddy trail or lake day.
How do I remove excess polish or fix smudges on the trail quickly?
I carry acetone wipes or a cotton pad with a small amount of remover. For small smudges, I gently lift the polish with a tiny brush dipped in remover, let the nail dry, then spot-paint and reseal with a top coat. Quick fixes work best when the polish hasn’t fully cured into the finish yet.
What creative variations can I try to keep the look fresh between trips?
I mix motifs: alternate tire-track stamps with starry skies, swap in mossy greens, add a gradient dusk, or top with gold “embers” flakes. Holo flake polish gives texture without roughness, and decals let me change themes fast. Small tweaks keep the set interesting without a full redo.
0 Comments